Priya’s neighbour knocked on her door last Sunday holding two things: a warm, crackling loaf of bread and a small jar of something that looked like greyish pancake batter. “Here’s the recipe,” she said, nodding at the jar. Priya blinked. “That’s not a recipe. That’s… goo.” Her neighbour laughed. “That’s the recipe. Feed it flour and water for a week, and it will feed you bread for the rest of your life.”
That jar was a sourdough starter — a living culture of wild yeast and friendly bacteria that has been leavening bread since long before anyone knew what yeast was. It sounds like kitchen magic, but it is one of the simplest fermentation projects a beginner can take on. No special equipment, no expensive kit, no skills required. Just flour, water, a jar, and about five minutes a day. If you can stir a spoon, you can grow a starter. Here is exactly how.
What a Sourdough Starter Actually Is
A sourdough starter is flour and water, fed regularly until it becomes colonised by wild yeast and lactic acid bacteria. The yeast produces carbon dioxide that makes bread rise; the bacteria produce the acids that give sourdough its tangy flavour and chewy texture. It is the same basic process happening inside a jar of sauerkraut or kimchi — microbes doing their slow, delicious work.
The difference from the little packet of commercial yeast in your cupboard is patience and character. Commercial yeast is one fast strain bred for speed: it raises dough in an hour but adds almost no flavour. A starter is a whole community of microbes that needs 4–6 hours — and repays you with bread that is nutty, sour, and complex. Once established, a healthy starter can live for decades. Think of it less like a recipe and more like a pet culture, like a kombucha SCOBY: it eats, it breathes, it reacts to temperature, and it rewards consistent care.
What You Actually Need (Almost Nothing)
This may be the cheapest hobby on this entire site:
- A glass jar, 500 ml to 1 litre. A clean jam or pickle jar, a plastic tub — anything food-safe. The lid stays loose or covered with cloth, never screwed tight.
- Flour. Plain whole-wheat or unbleached all-purpose flour. Whole wheat has more wild yeast and minerals, so it gets going faster. One small bag is more than enough.
- Water. Tap water is fine in most places. If yours is heavily chlorinated, leave a jug out overnight so the chlorine evaporates.
- A spoon, a rubber band, and optionally a kitchen scale. The rubber band marks the jar level after feeding so you can see the rise. A scale makes feedings calmer, but cups work too.
Total cost: the flour already in your kitchen. The real investment is five minutes a day for a week.
Your 7-Day Starter, Day by Day
Find a kitchen spot around 22–28°C — on top of the fridge, a high shelf, away from draughts and direct sun. Warmer works faster; cooler works slower but more flavourfully.
Day 1: Mix 50 g whole-wheat flour with 50 g water in the jar. Stir until no dry flour remains — thick mud. Cover loosely, leave 24 hours. Nothing visible happens. Normal.
Day 2: You may see a few small bubbles. Stir once, cover, leave it. If nothing happens, do nothing. Resist the urge to “help”.
Day 3: Discard about half the mixture (it is not ready to eat yet), then add 50 g flour and 50 g water. Stir, mark the level with your rubber band, cover, wait 24 hours.
Days 4–5: Repeat the same feeding daily. Expect more bubbles and a slightly sour, yoghurty smell. An acetone whiff on day 4 or 5 means the starter is hungry, not dead.
Day 6: Feed as usual, then watch: if it roughly doubles within 4–6 hours and is full of bubbles, you are close.
Day 7: Feed as usual. If it doubles in 4–6 hours at room temperature, it is ready to bake with. If sluggish, continue the same routine for 2–3 more days. Some starters take 10 days in cool kitchens — patience is the entire skill.
How to Know It Is Really Ready
Do not trust the calendar — trust these four signs:
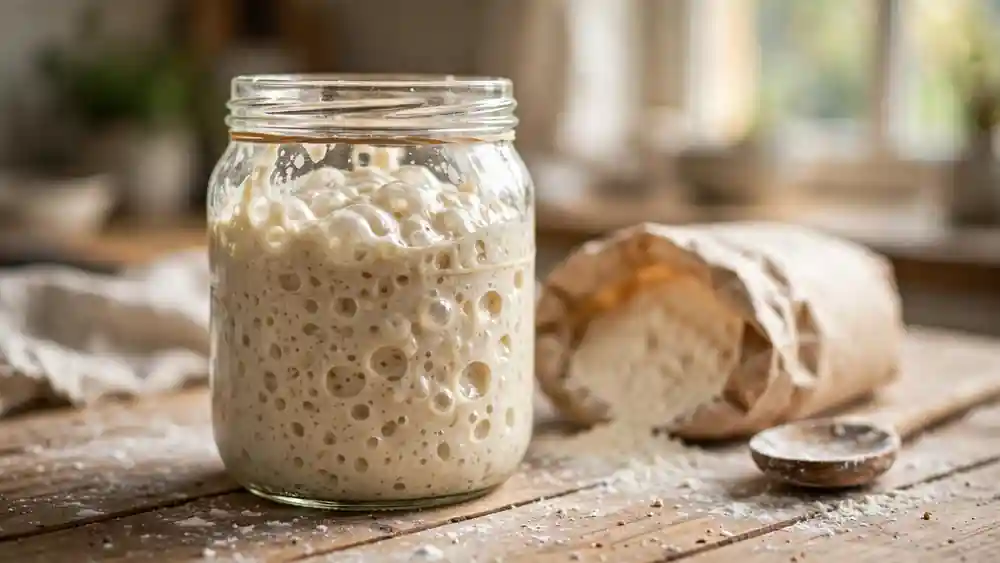
- It doubles predictably. After feeding, it rises to roughly twice its volume within 4–6 hours, then slowly falls. The rubber band makes this easy to see.
- The float test. Drop a spoonful into a glass of water. If it floats, enough gas is trapped inside for baking. (Doubling is the more reliable sign.)
- The smell. Ripe starter smells pleasantly tangy, like yogurt or green apples. A harsh nail-polish smell means it is hungry — feed it and try again.
- The texture. Stirred-up starter looks like a webby, stretchy sponge full of holes — the gluten network holding yeast-produced gas.
Once it passes these tests two days running, you are a sourdough baker. Your natural next step is a full bread baking guide, where that starter finally meets a loaf.
5 Mistakes That Worry (But Rarely Kill) Starters
1. Giving up on Day 4. The number-one killer. Days 3–5 look gross and smell weird; beginners assume failure. Keep feeding — it almost certainly is fine.
2. Bleached flour or hot water. Bleach and heat kill microbes. Use unbleached flour and lukewarm or room-temperature water, always.
3. An airtight lid. The culture breathes and releases gas. A loose lid or cloth with a rubber band — never screwed tight, or pressure builds.
4. Chaotic feeding times. During week one, feed once a day at roughly the same time. Wild swings stress the culture.
5. Panicking over “hooch”. That dark liquid on top is hooch — alcohol the yeast made when it ran out of food. Harmless. Stir it in for more sour flavour or pour it off, then feed normally. It just means the starter was hungry.
Keeping It Alive After Day 7
Maintenance is easier than the build. Bake weekly? Keep the jar at room temperature and feed once a day. Bake less often? Store it in the fridge and feed once a week — cold slows the microbes to a crawl. Before baking, take it out, feed it, and wait for the double. That is the whole routine: feed, wait, bake, refrigerate.
Holiday for two weeks? Feed, refrigerate, done. A month? It will survive, though it may need two or three feedings to wake up. Neglected starters almost always revive — they are far tougher than they look.
- Name it. Bakers who name their starter feed it more consistently. Not science; psychology. It works.
- Save the discard. The half you discard at each feeding makes excellent pancakes, crackers, and flatbreads — search “sourdough discard recipes” and your waste becomes a second hobby.
- Hot kitchen? Above 30°C, your starter ferments fast and gets too sour. Feed twice a day, or move it to the coolest corner.
- Stalled starter? Switch one or two feedings to whole-wheat or rye flour. The extra nutrients usually kick-start it.
- Film your first loaf. A recipe video of the journey — day 1 to first slice — makes genuinely satisfying content.
What Does It Really Cost?
Almost nothing. A small bag of flour covers the entire 7-day build plus weeks of maintenance; the jar comes from your recycling. After your third homemade loaf, the starter has paid for itself many times over compared with bakery prices. Honest time cost: five minutes a day for a week, then five minutes a week, forever.
Keep Reading
- Baking Bread at Home for Beginners: Your First Perfect Loaf, Step by Step
- Fermentation Basics for Beginners: Sauerkraut, Kimchi and Pickles at Home
- Kombucha Brewing at Home for Beginners: Your First Fizzy Batch, Step by Step
- Home Cheese Making for Beginners: Mozzarella, Ricotta and Paneer Step by Step
Sourdough Starter Questions, Answered
Is the dark liquid on top mould? Almost certainly not — that is hooch, harmless alcohol. Mould looks fuzzy and grows in pink, orange, black or green patches. True mould is rare; scoop it off, feed, and the culture usually recovers.
Can I use tap water? Usually yes. Only heavy chlorination is a concern — if your water smells like a swimming pool, leave a jug out overnight and the chlorine dissipates.
Whole wheat or all-purpose? Start with whole wheat for a faster start. Many bakers switch to all-purpose once established — milder flavour, cheaper feedings. Both work.
How long before I can bake? Most starters are ready in 7–10 days. Baking with a day-3 starter gives dense, gummy bread. Wait for the reliable doubling — you only do this build once.
A jar of flour and water is about to become the most reliable kitchen companion you own. Feed it, name it, and enjoy the best bread of your life — made by microbes you raised yourself.